 Bigger
Guides › Premiere Pro
Premiere Pro Captions Plugin: Install and Use Bigger Subs
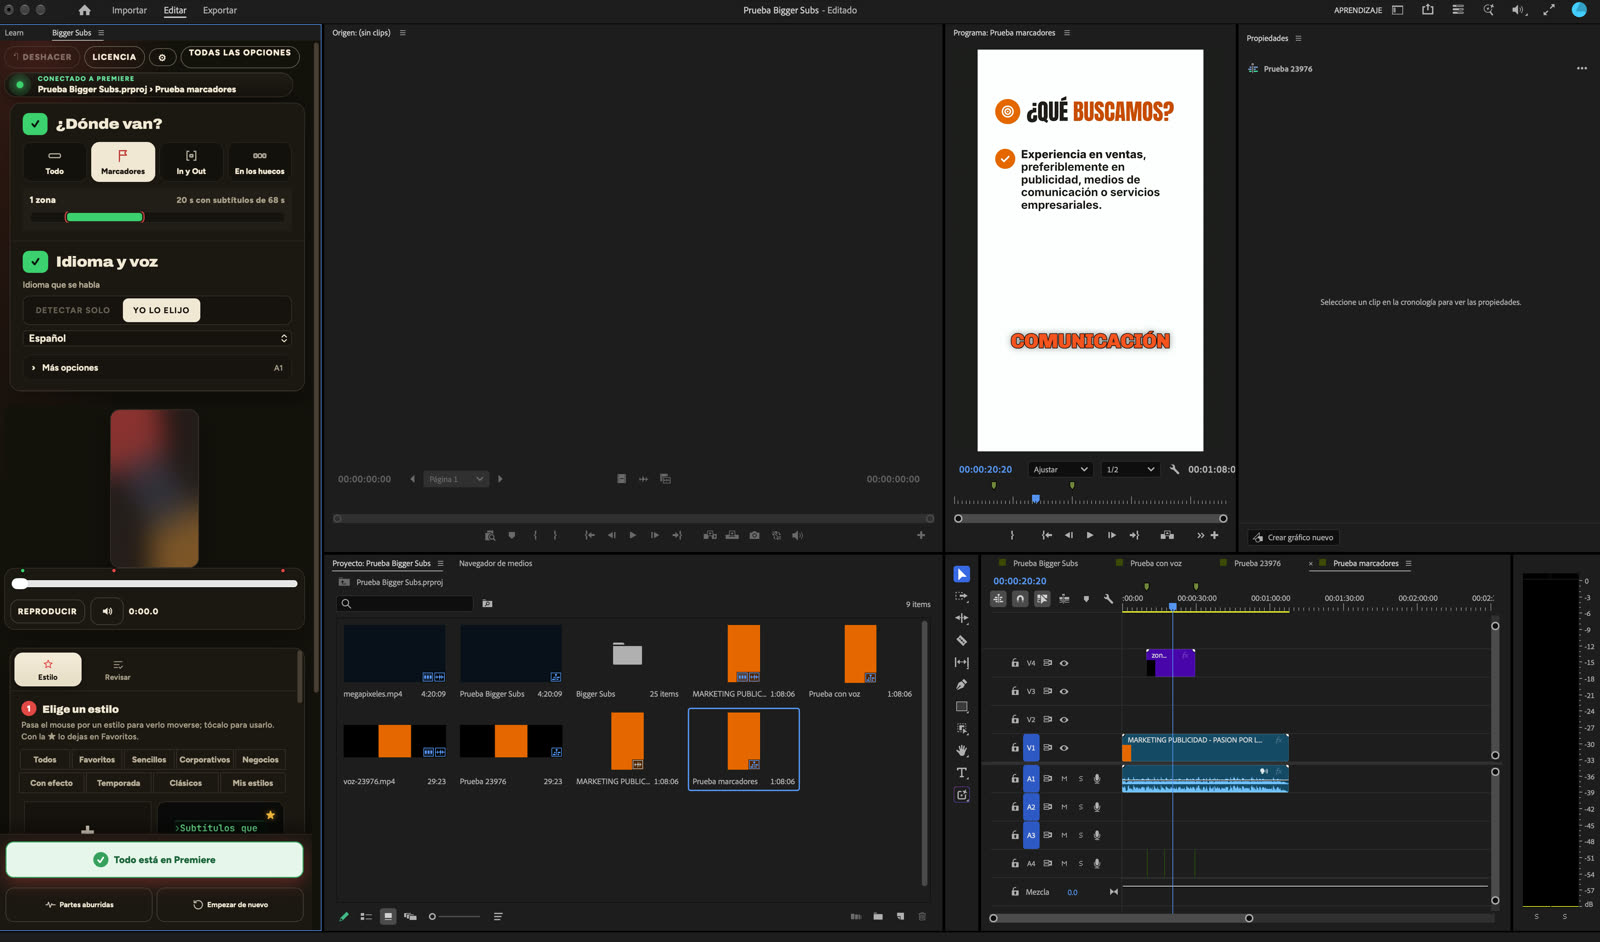
Bigger Subs opens as a panel inside Premiere Pro. This is the full walkthrough, from the first launch to animated captions on your timeline, written for people who have never used a plugin before.
Updated October 28, 2026 · by The Bigger Studio
Bigger Subs in Premiere Pro is fully tested on Mac. On Windows it is still in testing and may have bugs.
Quick answer
- Requirements: Adobe Premiere Pro 2025 or newer on Mac or Windows, and the Bigger Subs app installed.
- Open it: in Premiere Pro, choose Window › UXP Plugins › Bigger Subs.
- Use it: choose where, language and style, press create, then review the text.
What the plugin does
Bigger Subs is a desktop app that transcribes the voice in your video on your computer and builds animated, word-by-word subtitles. In Premiere Pro, it is available as a panel that sits next to your timeline. It places the result on your sequence as a transparent clip (ProRes 4444 with transparency) on its own track, and puts the sounds on a separate track, so you can edit, move or delete them like any other clip.
The same app also works with DaVinci Resolve (free and Studio) and Final Cut Pro on Mac. You can also use it from the app window, without the panel.
Step 1: install Bigger Subs
- Download the installer for your system from the main Bigger Subs page and run it.
- Open the app once and activate your free trial. The app installs the panel in Premiere Pro by itself, and after activation it works offline.
- If Premiere Pro was open at that moment, restart it so the panel shows up.
Step 2: open the panel in Premiere Pro
- Open a project and a sequence with someone speaking.
- Choose Window › UXP Plugins › Bigger Subs.
- Dock the panel wherever you like. Many editors put it next to the Program Monitor.
If you don't see Bigger Subs in the menu, check that you are using Premiere Pro 2025 or newer and that the app was installed on the same computer.
Step 3: choose where the subtitles go
The panel offers three options:
- Everything: the whole sequence.
- Markers: only the zones you marked. Set a marker at the start and end of each part you want subtitled.
- In/Out: only the range between your In and Out points.
Zones are useful when a video mixes talking and music, or when you only want subtitles on the best moments.
Step 4: language and style
- Choose the language that is spoken in the video. Bigger Subs transcribes many languages.
- Browse the style gallery. There are more than 60, grouped by type.
- Select a style. The preview shows it over a real frame of your own video, so you can judge the readability before you create.
Step 5: create
Press the create button. Bigger Subs transcribes the voice, times each word, picks the key words to emphasize and renders the subtitles. When it finishes, the clip appears on its own track in your sequence, with the sounds on another track. The panel keeps your timeline untouched except for those new tracks.
Step 6: review the text
No automatic transcript is perfect. Open the review step, read the lines and fix any wrong word, especially names, brands and numbers. Then update the clip. Only the subtitles are redone; the rest of your edit stays as it is.
Panel or app window?
The panel is a simpler version designed for working without leaving Premiere: where, language, style with preview, create and review. The app window has the full set of controls, such as detailed adjustments to the letters and effects. Use the panel for speed, and the window when you want to fine-tune.
Good to know
- Privacy: the video is not uploaded to the internet. Transcription happens on your computer.
- Safe margins: the subtitles avoid the areas that TikTok, Reels and Shorts cover.
- Languages: the app interface is available in six languages.
- Computer: a computer with a good graphics card makes the process faster.
A typical workflow
Most editors follow the same routine. They finish the cut first, so the timing of the audio no longer changes. Then they set markers on the parts that need subtitles, open the panel, choose a style and create. After a quick review of names and numbers, they watch the result once with the sound off, as most viewers will. If the edit changes later, they simply run the panel again for that zone.
Troubleshooting
- The panel is empty or won't open: make sure the Bigger Subs app is installed and was opened at least once, then restart Premiere Pro.
- The transcript is wrong: check you picked the right language, and that the voice track is clear and not drowned out by music.
- The subtitles are hidden on the timeline: check that the new track is enabled and sits above your video.
FAQ
Where do I find the Bigger Subs panel in Premiere Pro?
Choose Window › UXP Plugins › Bigger Subs in Premiere Pro. You need Premiere Pro 2025 or newer.
Do I need an internet connection?
Only to activate it. After that, the voice is transcribed on your computer and the app works offline.
Does the plugin work on Windows?
Yes. Bigger Subs for Premiere Pro runs on both Mac and Windows.
Can I try it before I pay?
Yes. There is a free trial of 2 days with everything included, and after it you pay once instead of a monthly subscription.
Try Bigger Subs free for 2 days
Mac and Windows. Works with Premiere Pro 2025 or newer, DaVinci Resolve and Final Cut Pro. Everything runs on your computer.
Get the free trialMore guides: Add subtitles in Premiere Pro · Animated subtitles in Premiere Pro · Auto captions in Premiere Pro · Captions in Final Cut Pro